It’s all in the details to not have to go back there again to rinse and repeat, may as well do a proper the first time around Matt. which I quite enjoy as I’m ocd or just f’ing nuts as the better half calls it.
You are using an out of date browser. It may not display this or other websites correctly.
You should upgrade or use an alternative browser.
You should upgrade or use an alternative browser.
Time for an overhaul of my 1.9 '98 BMW Z3 Individual
- Thread starter Matt Barnes
- Start date
- Joined
- Jul 18, 2020
- Points
- 128
- Location
- Portchester, Fareham
- Model of Z
- 1998 BMW Z3 Individual 1.9 M44 B19
well here we are again..... lovely sunny Saturday and should be out enjoying a trip... but ..it was cutting the grass and diving under the arches again.
First up, top coat on the strut towers and valance..... now you could say my masking up was a bit.........pants..)")


and again, Tristar Color paint never let me down......however, I let myself down.... forgot to cover the underneath of the coilpack...
so I'll have to take that off and clean it up

I'll let that go off for a week then a light coating of 1k lacquer...

Then.... it was the turn of the connector box studs.... the sheared off studs were really fighting me and i couldn't drill through them.. ended up digging out a Dremel cobalt bit, and drilled a hole that way...

Then widened them with a 4mm drill bit.... then set about with the tap

then as per @Mazza , found an appropriate size bolt, cut the head off, cut in half and screwed in. Test fit the newly painted box.


I haven't got the plastic nuts, so I'll need to get those then spray the studs to finish it off.....
same again on the offside


Can't believe those studs took me hours....... mainly I think through blunt drill bits until I found my cobalt bit !
First up, top coat on the strut towers and valance..... now you could say my masking up was a bit.........pants..
and again, Tristar Color paint never let me down......however, I let myself down.... forgot to cover the underneath of the coilpack...
so I'll have to take that off and clean it up
I'll let that go off for a week then a light coating of 1k lacquer...
Then.... it was the turn of the connector box studs.... the sheared off studs were really fighting me and i couldn't drill through them.. ended up digging out a Dremel cobalt bit, and drilled a hole that way...
Then widened them with a 4mm drill bit.... then set about with the tap
then as per @Mazza , found an appropriate size bolt, cut the head off, cut in half and screwed in. Test fit the newly painted box.
I haven't got the plastic nuts, so I'll need to get those then spray the studs to finish it off.....
same again on the offside
Can't believe those studs took me hours....... mainly I think through blunt drill bits until I found my cobalt bit !
Attachments

- Joined
- Jul 18, 2020
- Points
- 128
- Location
- Portchester, Fareham
- Model of Z
- 1998 BMW Z3 Individual 1.9 M44 B19
they've seen worse mateDo your neighbours not say anything? .working on your car with no pants on

How many do you need ?
want them tapped ( let me know what size ) they go on easier if already tapped, rather than having to cut the thread
- Joined
- Jul 18, 2020
- Points
- 128
- Location
- Portchester, Fareham
- Model of Z
- 1998 BMW Z3 Individual 1.9 M44 B19
thank you Malc!.. 4 if you don't mind !.. I got the bolts from "ye olde sweet tin of bolts and screws" so not sure of the pitch as the head just says A480 FS...I can just grab another one, put it in the vice and wind each one on to cut a thread.View attachment 358761
How many do you need ?
want them tapped ( let me know what size ) they go on easier if already tapped, rather than having to cut the thread
Might give the 2.8 a run in the sun later and drop them off 
- Joined
- Jul 18, 2020
- Points
- 128
- Location
- Portchester, Fareham
- Model of Z
- 1998 BMW Z3 Individual 1.9 M44 B19
be good to see you and the 2.8!Might give the 2.8 a run in the sun later and drop them off
- Joined
- Jul 18, 2020
- Points
- 128
- Location
- Portchester, Fareham
- Model of Z
- 1998 BMW Z3 Individual 1.9 M44 B19
well that's a weekend wrap ... clear coat applied to the valence and the strut towers... it's amazing the difference it makes to the engine bay...


Factory Fresh !!!

and it was topped off by a visit from @Mazza , who graced me with the plastic nuts for the wheel arch connector boxes

good long old chat and great to see the 2.8 on the road.... looks great, sounds great !!!
so I tapped the thread using a spare bolt in the vice, just wound it round with the ratchet to cut the thread

tidied up a bit more under the frame for when I get the new wishbones on with the new lollipops...
ground back and primed, then spread on some seam sealer.... next weekend I'll give that a bit of top coat

whilst waiting for things to dry, I segwayed onto the under trays.
Addressed my pet peeve of overspray. I can't remember making this much mess doing the arches, but I must have done..

so took to it with a scotch pad and a mixture of meths and white spirit... and we get this

same with the wheel arch lining, now I know for a fact the bright strip at the top wasn't me, so someone's been there with a can before.

no after picture I'm afraid but you get the gist. Scotch pad, white spirit and elbow grease !!
so that's this weekend done... I plan now on taking a week off work soon... and maybe...just maybe, get this puppy on four wheels !
Factory Fresh !!!
and it was topped off by a visit from @Mazza , who graced me with the plastic nuts for the wheel arch connector boxes
good long old chat and great to see the 2.8 on the road.... looks great, sounds great !!!
so I tapped the thread using a spare bolt in the vice, just wound it round with the ratchet to cut the thread
tidied up a bit more under the frame for when I get the new wishbones on with the new lollipops...
ground back and primed, then spread on some seam sealer.... next weekend I'll give that a bit of top coat
whilst waiting for things to dry, I segwayed onto the under trays.
Addressed my pet peeve of overspray. I can't remember making this much mess doing the arches, but I must have done..
so took to it with a scotch pad and a mixture of meths and white spirit... and we get this
same with the wheel arch lining, now I know for a fact the bright strip at the top wasn't me, so someone's been there with a can before.
no after picture I'm afraid but you get the gist. Scotch pad, white spirit and elbow grease !!
so that's this weekend done... I plan now on taking a week off work soon... and maybe...just maybe, get this puppy on four wheels !
- Joined
- Jul 18, 2020
- Points
- 128
- Location
- Portchester, Fareham
- Model of Z
- 1998 BMW Z3 Individual 1.9 M44 B19
Here we are again, another weekend.......first things first... I had to take that coil pack off to get rid of that overspray... so that's now a lot better

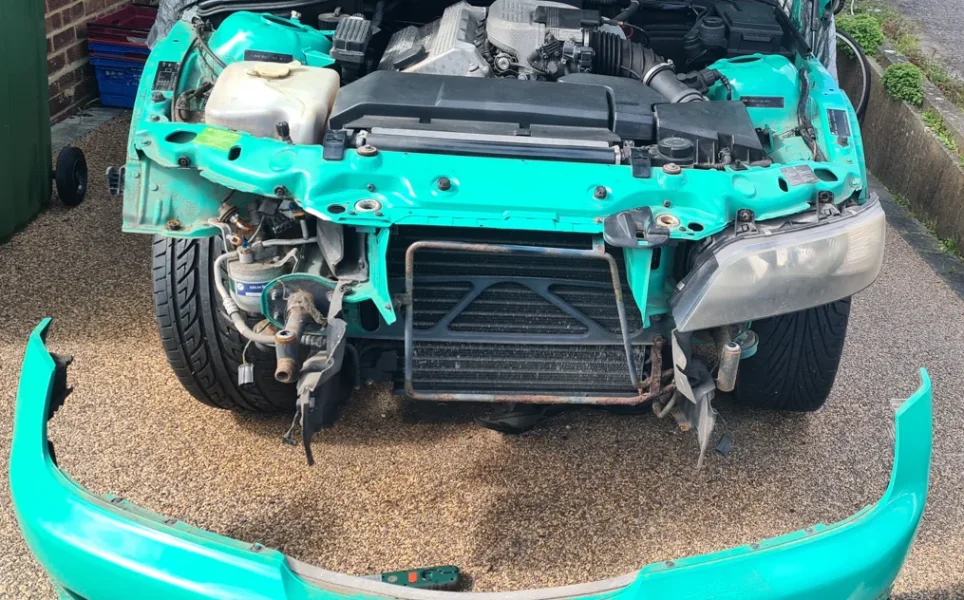
Then I decided to take the headlights off and the bumper....
Main reason for the bumper is to address this.... cracked paint..or at least lacquer

Plus it makes life much easier for when I swap over the power steering hoop
As you know it's just four M8 bolts, draw slightly toward you gives you a bit more access to the connectors...notice how crispy the indictor bulb is ? paint just peels off


eye eye... nod's as good as a wink to a blind man !

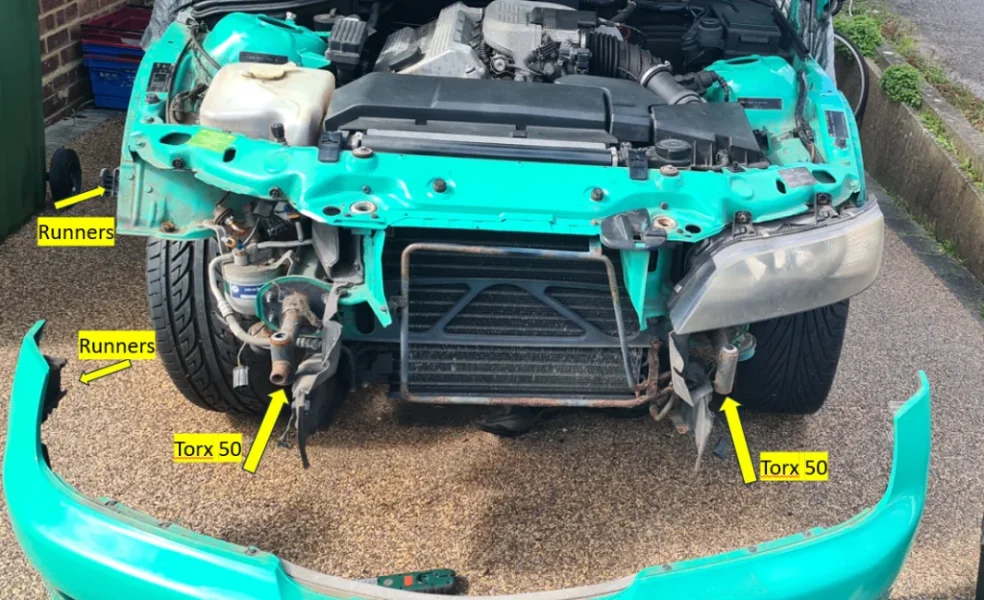
now ironically I ended up having to get the bumper off in order to get to the last headlight bolt, as the adjuster was wound up at an angle... so it's literally two Torx 50 bolts and the whole thing just slides off. Either side of the bumper sits in runners, so it is literally just two bolts.

The curved bits in the crash bar are what lines up the posts. So the bolt goes through that vertical post.


Getting the bumper off gave me a clear view of that final headlight adjuster and out they both came

I'm actually thinking of leaving the bumper off, as I've got prime access to do the whole front suspension, power steering hoop and anything else I need to do under there...

The only thing to report from removing the bumper was....a cobweb

It's a good job I've got a new power steering hoop !!

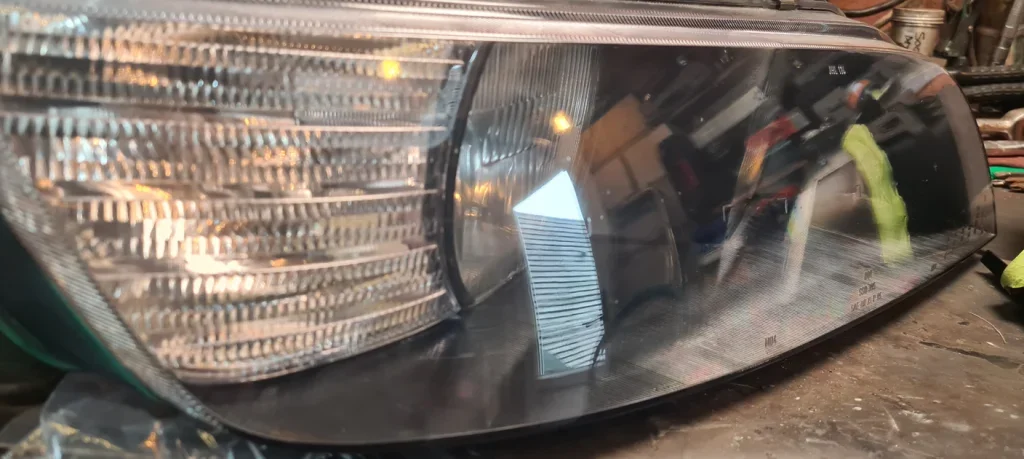
So the plan with the headlights is to sand them back and clear coat. I've ordered the 3M kit which some youtubers have recommended.


I went back online ordering clips and trims etc... these are for the kick plates... the ones on RealOEM are well expensive !, like 2 quid each !
got these from Vehicle Clips, pack of 10 for a fiver...

Then I decided to take the headlights off and the bumper....
Main reason for the bumper is to address this.... cracked paint..or at least lacquer
Plus it makes life much easier for when I swap over the power steering hoop
As you know it's just four M8 bolts, draw slightly toward you gives you a bit more access to the connectors...notice how crispy the indictor bulb is ? paint just peels off
eye eye... nod's as good as a wink to a blind man !
now ironically I ended up having to get the bumper off in order to get to the last headlight bolt, as the adjuster was wound up at an angle... so it's literally two Torx 50 bolts and the whole thing just slides off. Either side of the bumper sits in runners, so it is literally just two bolts.
The curved bits in the crash bar are what lines up the posts. So the bolt goes through that vertical post.
Getting the bumper off gave me a clear view of that final headlight adjuster and out they both came
I'm actually thinking of leaving the bumper off, as I've got prime access to do the whole front suspension, power steering hoop and anything else I need to do under there...
The only thing to report from removing the bumper was....a cobweb
It's a good job I've got a new power steering hoop !!
So the plan with the headlights is to sand them back and clear coat. I've ordered the 3M kit which some youtubers have recommended.
I went back online ordering clips and trims etc... these are for the kick plates... the ones on RealOEM are well expensive !, like 2 quid each !
got these from Vehicle Clips, pack of 10 for a fiver...
Attachments
Last edited:
- Joined
- Jul 18, 2020
- Points
- 128
- Location
- Portchester, Fareham
- Model of Z
- 1998 BMW Z3 Individual 1.9 M44 B19
well it's Sunday... and I know it's early... that's because there's no action today as we're popping across to the Island.. (Pompey speak for going to the Isle of Wight).. to see the out In laws.
however... something that leapt out while looking back at the photos..... I don't have an Aux cooling fan !!


I've never ever ever never noticed until I took the bumper off !..... evidently it's not imperative as it's electrical and just "helps" with cooling. Not sure whether to bother getting one ?
the other thing I did yesterday was tidy up and fix the undertray..... if you didn't know, the tray has what I assume to be sound deadening material... which is excellent for soaking up oil and water like a sponge... (and yes, it started raining)

so used a wide blade chisel to scrape off as as much muck as possible


now, those of you that are experts in all things undertray will notice the "air duct" is missing......well.. that's because it was sheared off of it's rivets... but was still there..

evidently, it shearing off is a common thing if it gets hit by debris flying through the bumper.
I decided against re riveting and went for an upgrade..... round head bolts and shiny nuts


Have no idea if that will make any difference whatsoever..... but... it's something that was in two bits but now one again !!
anyway.. off to the Island....!
however... something that leapt out while looking back at the photos..... I don't have an Aux cooling fan !!
I've never ever ever never noticed until I took the bumper off !..... evidently it's not imperative as it's electrical and just "helps" with cooling. Not sure whether to bother getting one ?
the other thing I did yesterday was tidy up and fix the undertray..... if you didn't know, the tray has what I assume to be sound deadening material... which is excellent for soaking up oil and water like a sponge... (and yes, it started raining)
so used a wide blade chisel to scrape off as as much muck as possible
now, those of you that are experts in all things undertray will notice the "air duct" is missing......well.. that's because it was sheared off of it's rivets... but was still there..
evidently, it shearing off is a common thing if it gets hit by debris flying through the bumper.
I decided against re riveting and went for an upgrade..... round head bolts and shiny nuts
Have no idea if that will make any difference whatsoever..... but... it's something that was in two bits but now one again !!
anyway.. off to the Island....!
- Joined
- Jul 18, 2020
- Points
- 128
- Location
- Portchester, Fareham
- Model of Z
- 1998 BMW Z3 Individual 1.9 M44 B19
morning mate, cheers.... they apparently don't sacrifice their first born either !Aux fan only needed if you have aircon…that’s on the M54 anyway. My M43 only had an electric fan.
Enjoy the island..remember to set any clocks back 20 years
...... I do have aircon... factory fitted.. for an M44... never had a problem so hopefully the auxiliary one is precautionary !- Joined
- Jul 18, 2020
- Points
- 128
- Location
- Portchester, Fareham
- Model of Z
- 1998 BMW Z3 Individual 1.9 M44 B19
well I know it's Good Friday but there's a car to restore..... I was originally going to swap over the gear linkages on the Peugeot, but they wouldn't budge... so.... I left it....... because ..
Not only is it Good Friday... it's National Headlight Restoration Day !... who knew!
so grabbing headlight number 1 and my 3M headlight restoration kit.....it was time to be brave..

went to clean someone else's overspray off the bottom (bumper repair I reckon)

and realised the black is actually black paint !!

so I'll need to repaint that bit...
right... back to the main event... I didn't need to tape up the clips, but hey the tape comes with the kit....

Then it's on with the first pad.....500 grit on the drill attachment....and off we go !!!!

GULP !!!

Need to get it nice and uniform and yes you can actually sand out stone chips...
then it's the 800 grit pad on the drill

and you just keep going lightly over the lens until the scratched surface is nice and uniform
Then it was the turn of the 3000 grit Trizact pad... and this is to get rid of the swirls and the haze..

Although that looks a hell of lot better, we're not done yet....oh no...
This time we get to polish !!!!... polish and pad come with the kit....(the yellow stripe and white square are LED lights on the garage ceiling).....
warning... the polish will fling everywhere !!

and perhaps THE most important part...... clear coat.... or else the plastic will oxidise almost straight away....

so, comparing the before and after.... like night and day


Then it was rinse and repeat on the offside one

and just to prove I did both and didn't flip the picture !

so my view?.... worth every penny of 19 quid !....the clearcoat was another 15 quid.. but for only £34 you can have these results !!

Not only is it Good Friday... it's National Headlight Restoration Day !... who knew!
so grabbing headlight number 1 and my 3M headlight restoration kit.....it was time to be brave..
went to clean someone else's overspray off the bottom (bumper repair I reckon)
and realised the black is actually black paint !!
so I'll need to repaint that bit...
right... back to the main event... I didn't need to tape up the clips, but hey the tape comes with the kit....
Then it's on with the first pad.....500 grit on the drill attachment....and off we go !!!!
GULP !!!
Need to get it nice and uniform and yes you can actually sand out stone chips...
then it's the 800 grit pad on the drill
and you just keep going lightly over the lens until the scratched surface is nice and uniform
Then it was the turn of the 3000 grit Trizact pad... and this is to get rid of the swirls and the haze..
Although that looks a hell of lot better, we're not done yet....oh no...
This time we get to polish !!!!... polish and pad come with the kit....(the yellow stripe and white square are LED lights on the garage ceiling).....
warning... the polish will fling everywhere !!
and perhaps THE most important part...... clear coat.... or else the plastic will oxidise almost straight away....
so, comparing the before and after.... like night and day
Then it was rinse and repeat on the offside one
and just to prove I did both and didn't flip the picture !
so my view?.... worth every penny of 19 quid !....the clearcoat was another 15 quid.. but for only £34 you can have these results !!
Attachments
Last edited:
- Joined
- Jul 18, 2020
- Points
- 128
- Location
- Portchester, Fareham
- Model of Z
- 1998 BMW Z3 Individual 1.9 M44 B19
very rewarding job mate, well worth the effortWho dares wins ….nice job !
Did mine with that kit then @Holliez4 PPF’d them ..still look greatvery rewarding job mate, well worth the effort
- Joined
- Jul 18, 2020
- Points
- 128
- Location
- Portchester, Fareham
- Model of Z
- 1998 BMW Z3 Individual 1.9 M44 B19
right.. no rest for the wicked, so off we go again..........
back to those headlights.... as I said yesterday I managed to sand off the black paint on the underneath of each light, so it was a quick mask up and hit it with some Lidl special matte black paint..

came out lovely !

and the other one...

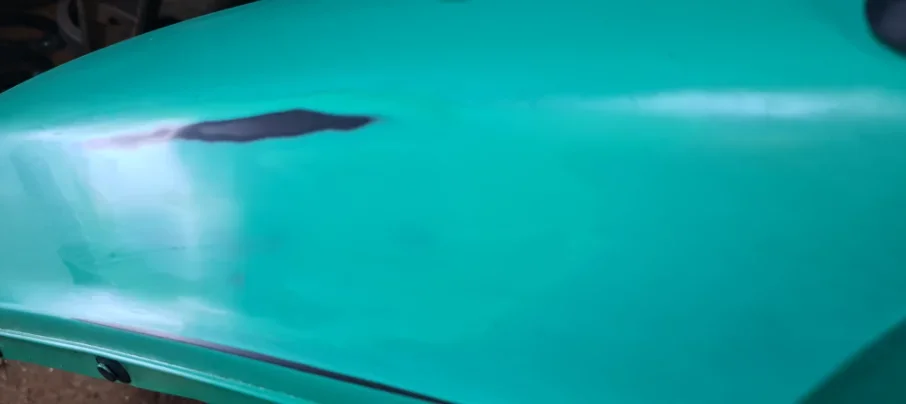
Then I turned my attention to the bumper...
As I said before either the lacquer had got contaminated or something from a previous job someone did... but it had peeled and cracked in just one area.... so I started cutting it back with a scotch pad.. then the discs from the headlight kit


more pants masking up !

Then a couple of coats of Tristar Color paint, and a couple of coats of 1K clear to finish off

yes I know.... poor girl...

back to those headlights.... as I said yesterday I managed to sand off the black paint on the underneath of each light, so it was a quick mask up and hit it with some Lidl special matte black paint..
came out lovely !
and the other one...
Then I turned my attention to the bumper...
As I said before either the lacquer had got contaminated or something from a previous job someone did... but it had peeled and cracked in just one area.... so I started cutting it back with a scotch pad.. then the discs from the headlight kit
more pants masking up !
Then a couple of coats of Tristar Color paint, and a couple of coats of 1K clear to finish off
yes I know.... poor girl...
Attachments
- Joined
- Jul 18, 2020
- Points
- 128
- Location
- Portchester, Fareham
- Model of Z
- 1998 BMW Z3 Individual 1.9 M44 B19
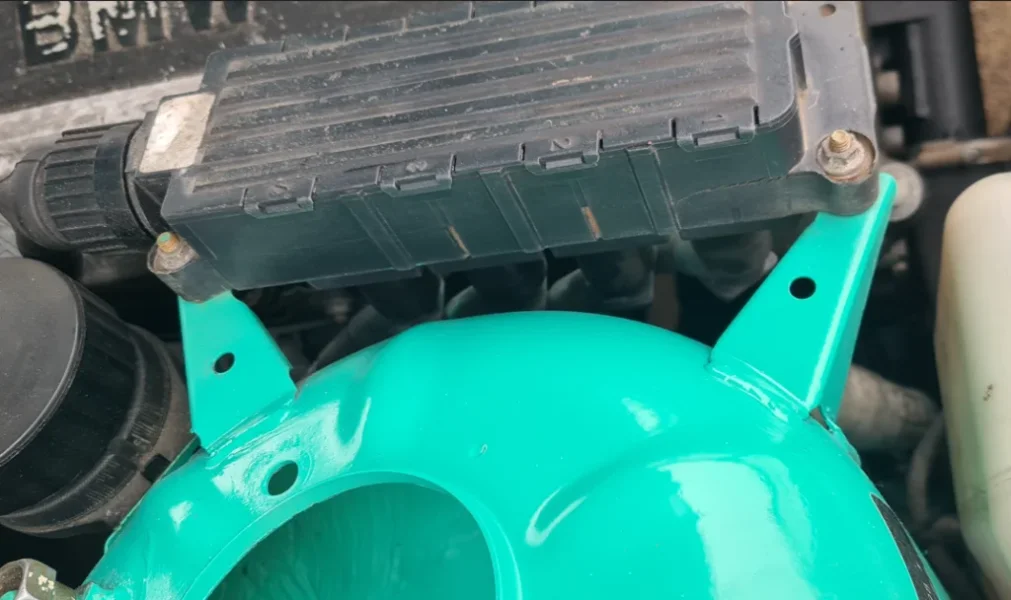
MAJOR UPDATE !... something I've restored is actually back on the car !!!
both wheel arch connector boxes back on thanks to @Mazza s fresh nuts !... ignore the dirty marks, that's my dirty fingers. I'm tempted to replace that offside brake line now, as it's letting the side down !


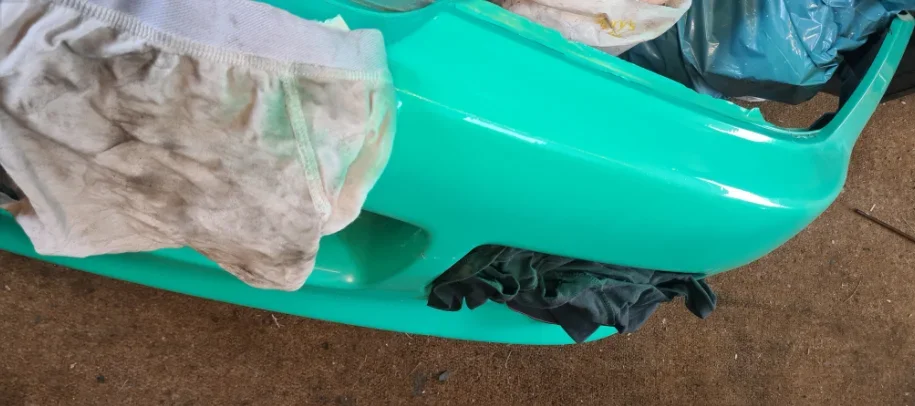
Then I test fitted the refreshed headlights and touched up bumper.... VERY happy with the results !!


now we get to the confused Matt part.....
was going to put the tank gaiter back on, but how the hell does the drain pipe fit?
i found a way up from the tank, and I can see the other end through the filler cap, but it just doesn't look right... obviously I took it out with the tank but I don't have photos as I was otherwise occupied getting the tank down.

Is this where you tell me I should have fitted it before the tank went in ?

both wheel arch connector boxes back on thanks to @Mazza s fresh nuts !... ignore the dirty marks, that's my dirty fingers. I'm tempted to replace that offside brake line now, as it's letting the side down !
Then I test fitted the refreshed headlights and touched up bumper.... VERY happy with the results !!
now we get to the confused Matt part.....
was going to put the tank gaiter back on, but how the hell does the drain pipe fit?
i found a way up from the tank, and I can see the other end through the filler cap, but it just doesn't look right... obviously I took it out with the tank but I don't have photos as I was otherwise occupied getting the tank down.
Is this where you tell me I should have fitted it before the tank went in ?
I wish you wouldn’t mention my nuts …. people will start to talk
!!!
!!!